Hamstra Roofing

Lift Operation Training

Enter your name and password to begin.

Hamstra aerial lift in operation
Hamstra Roofing Training Program

LIFT OPERATION
CERTIFIED

From safe unloading to flying the boom — master every aspect of aerial lift operation, maintenance, and troubleshooting.

4 Modules 11 Training Videos Jeopardy Challenge Timed Final Exam Certificate
Module 1

PRE-OP &
STARTUP

Before the boom moves an inch, you need to safely unload the machine, know your power options, start the engine correctly, and understand the remote in your hand. These four videos cover everything that happens before you go up.

5

Security Straps

Remove all five straps before tilting the trailer — four inside, one exterior.

$7K

Radio Remote Value

The remote is a $7,000 component. Keep it in its case whenever it's not in active use.

3

Outrigger Stages

Stage 3 is the maximum height that still maintains the machine's auto-level feature.

12 ga

Min Extension Cord

Running on 110V indoors? You must use at least 12-gauge cord — smaller won't provide enough power.

Video 1 of 4 — Getting the Machine Off the Trailer

Unloading Procedure — Step by Step

  1. Open and latch trailer doors fully. If unlatched, they can dig into the ground when the trailer tilts.
  2. Start the machine and remove all five security straps (four inside, one exterior).
  3. Pull the locking pin to unlock the trailer — the pin may be bent if previous operators forgot this step before tilting.
  4. Lift the trailer until the rear hits the ground. Place 2×6 boards between the white guide line and the end of the tread.
  5. Connect the radio remote. Handle with extreme care — it costs $7,000. Keep it in its case when not in use.
  6. Raise the jib to its highest position. Use enable button + start button + joystick simultaneously. The jib must clear the trailer before backing out.
  7. Set the remote to Turtle Mode (slow speed) for all loading and unloading. No exceptions.
  8. Back the machine out. Pull both drive levers back. Keep a few inches between tracks and the white guide lines. If the machine shuts off due to the tilt angle, simply restart and continue.
Video 2 of 4 — Types of Power (Diesel / Electric / Emergency)

Three Power Sources Explained

1. Diesel Engine — The primary power source for all normal outdoor operations. This is the default.

2. Electric (110V Outlet) — Used inside buildings (churches, warehouses) where diesel exhaust is prohibited. All machine functions work identically on electric. You must use at least a 12-gauge extension cord — smaller cords cannot power the machine on.

3. Emergency Electro-Pump — Runs off the machine's own battery. This is not a substitute for diesel or electric — it is for emergency use only to safely lower a worker who is stuck in the air if the diesel fails or fuel runs out. Do not use it for extended operation.

Critical: The emergency electro-pump is a rescue tool, not a convenience. Using it routinely drains the machine battery and leaves you without a safety net.
Video 3 of 4 — Starting Instructions, Outrigger Setup & Machine Anatomy

Startup Sequence & Outrigger Setup

Two-Key System: Key #1 selects the control mode — radio (ground) or basket. Key #2 powers the machine. For a cold start, turn Key #2 to the next stage to engage the glow plugs and wait for the orange light to turn off before starting the engine.

Connecting the Radio: Turn on the remote and look for the blinking light. Press the green button to connect. A fully lit display confirms you are connected to the machine.

Track Width: Keep the tracks in the extended (out) position at all times for stability, unless you are navigating through a narrow gate.

Traveling on Slopes: On hilly job sites, keep outriggers partially extended while traveling. If the machine tips, it lands on the outriggers — not on the booms.

Outrigger Stages:

  • Position One: Tight to the machine — for narrow areas, but limits turret rotation and reach.
  • Position Two (Default): Fully extended. Ensure locking pins are pushed all the way down every time.
  • Stages 1–3: Pressing the outrigger switch repeatedly lifts the machine. Stage 3 is maximum height while maintaining the auto-level feature.
  • Beyond Stage 3: One more press fully extends outriggers regardless of whether the machine is level — use with caution.

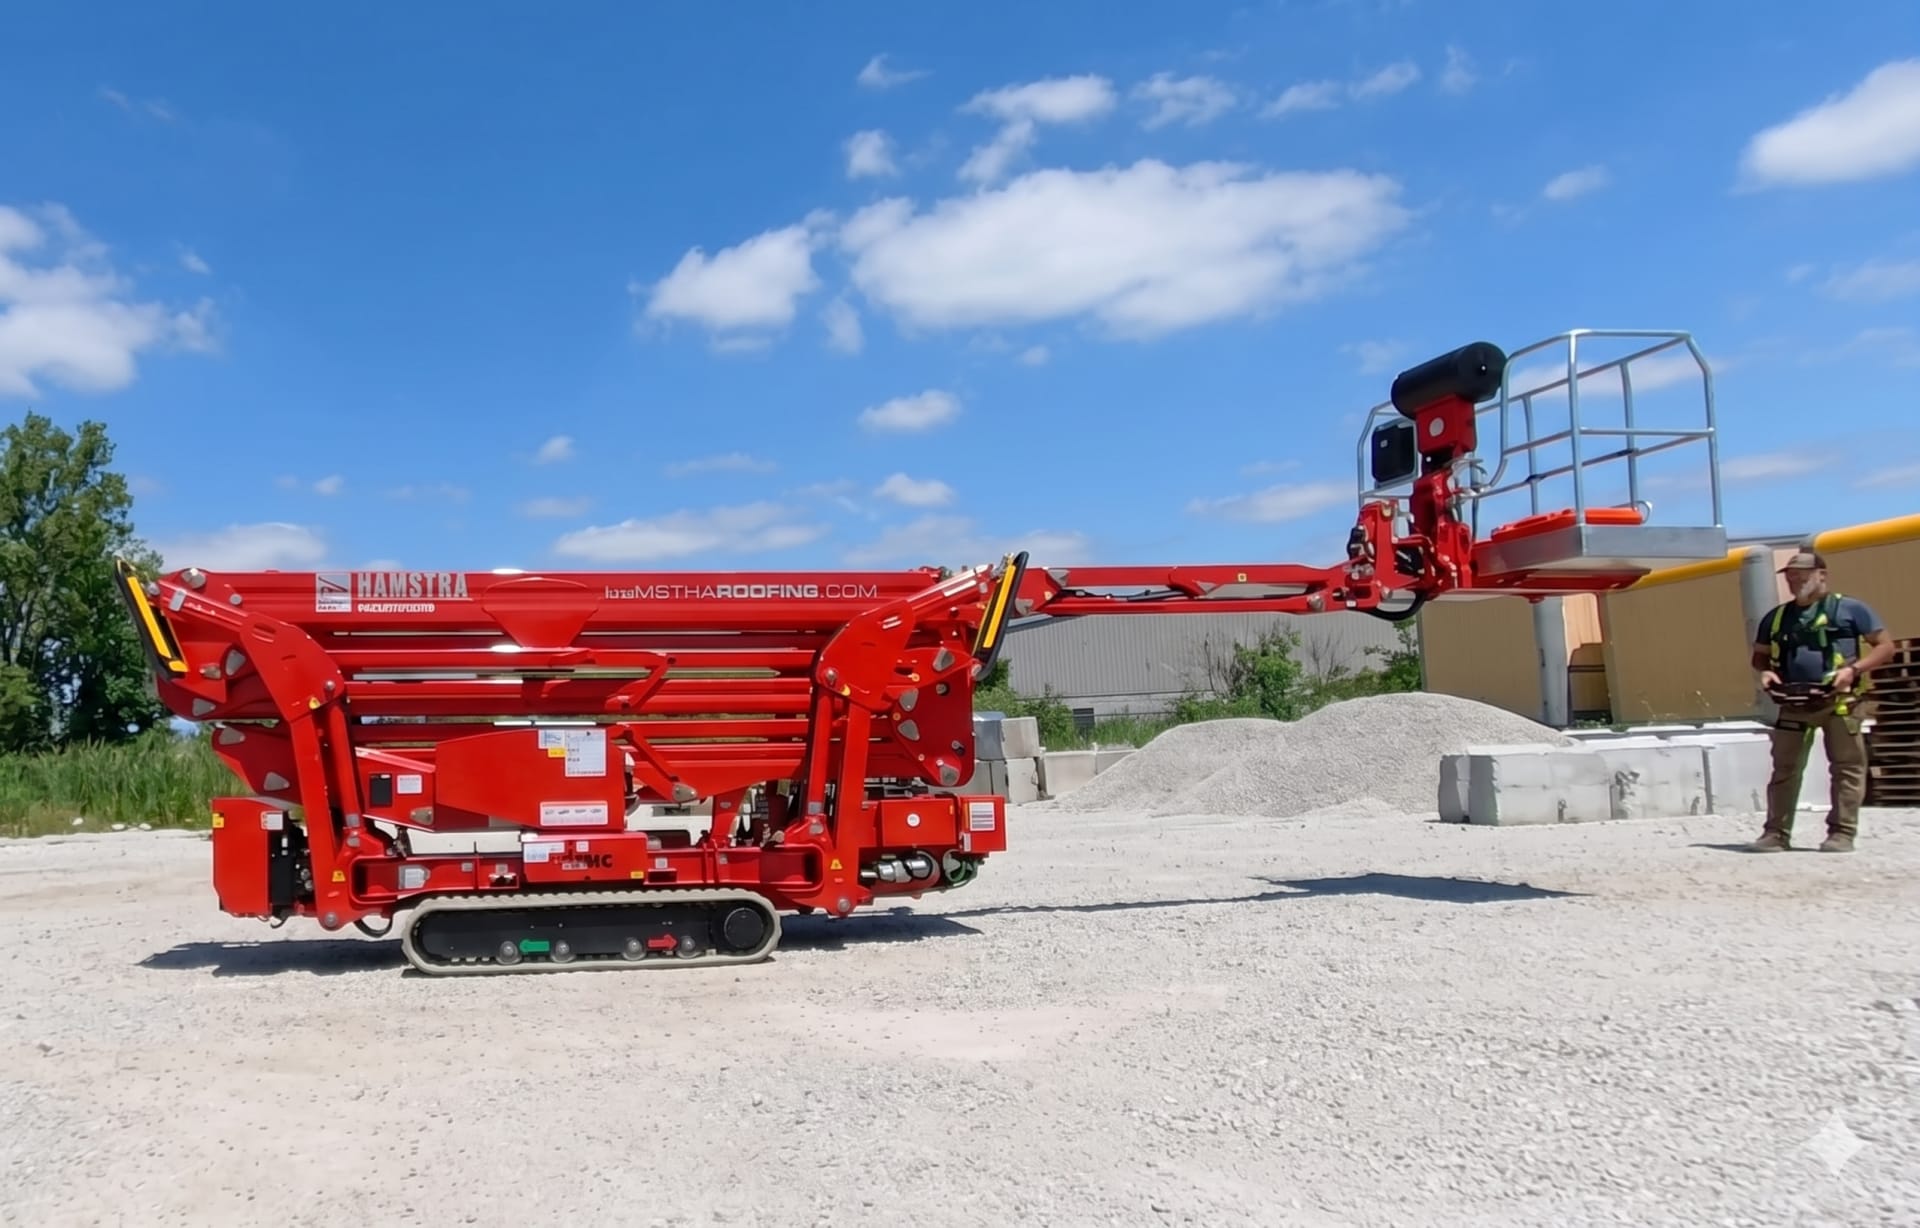
Machine Anatomy: The basket attaches to the jib (extra reach). The upper boom lifts and telescopes. The lower boom (lower pantograph) has two sections that operate simultaneously for vertical lift.

Video 4 of 4 — Radio Remote Functions & Color-Coded Controls

Color-Coded Remote Reference

Icon ColorFunction CategoryActive When
OrangeGround Controls — driving, tracks in/outOutriggers in up position
YellowAerial Functions — boom & basket movementsOutriggers deployed (disabled when up)
WhiteLeveling / Swivel — tilt and level basketAny position

Enable Buttons: Either the left or right enable button must be held to perform most operations.

Aerial Override: To operate aerial functions like the jib while outriggers are still up, press both the enable button and the park button simultaneously.

Speed Modes: High, Medium, and Turtle (slow). Always use Turtle for loading/unloading.

Start/Stop: One toggle shuts off or starts the engine. The red emergency stop is for emergencies only — not for routine shutdown.

Ground vs. Basket Remote Difference: The basket remote has one additional white icon for swiveling the basket side to side. Otherwise they are nearly identical.

Quiz badge

Module 1 Quiz

True or False — 4 questions, 25 pts each

Question 1 of 4

The machine should be set to "Turtle Mode" (slow speed) when loading or unloading from the trailer.

Question 2 of 4

Before tilting the trailer, you must first remove all five security straps from the machine.

Question 3 of 4

A standard 10-gauge extension cord is the minimum requirement when running the machine on 110V electric power.

Question 4 of 4

When traveling on a hilly job site, the outriggers should be kept fully retracted to improve the machine's mobility.

Module 1 Score

0

/ 100 pts

Module 2

OPERATING
THE MACHINE

Three ways to control the machine, and how to fly it from the basket. Understand which control method to use and when — including the backup systems if electronics fail.

Video 5 of 11 — Ways to Operate (Radio / Basket / Emergency Controls)
01

Radio Remote

Standard operation from the ground. Runs off an internal battery — a spare is kept charged in a dedicated box. If both batteries die, plug the remote directly into the machine via a tether cord.

02

Basket Controls

Nearly identical to the ground remote but activates from inside the basket. Switching to basket controls disconnects the ground radio. Follow the startup procedure to ensure proper connection.

03

Emergency Controls

Ground controls allow a ground operator to bypass all electronics and manually push valves. In total power failure, a lever can manually pump the hydraulics — instructions are in the owner's manual.

Video 6 of 11 — Aerial Functions — Flying from the Basket

Basket Operation Sequence

Entering Basket Mode: Set Key #1 to "basket mode." Turn on the basket remote and press the green button — all lights illuminate when connected. Put on your safety lanyards before any movement. Activate functions using either the dead man foot switch (blue toe button) or the upper enable button.

Before You Go Up:

  • Manually pull the step up and stow it. Leaving it down will cause it to bend during operation.
  • Raise the lower boom first. If the lower boom isn't high enough, the turret's rotation range is limited.

Flying the Machine: Use the joysticks to operate the upper boom and telescope outward to reach your target. Once clear of obstacles, rotate the turret as needed. Note: the lower boom may move more slowly as it approaches its lifting capacity limit.

Returning to Stow:

  1. Retract the telescope
  2. Lower the upper boom
  3. Lower the lower boom
  4. Center the turret — align the white paint strips on the turret for perfect centering
  5. Lower the jib last — keep the step in its upright position throughout
Note: While the machine has an auto-home feature to collapse automatically, manual operation is safer — the auto-home can't see trees, chimneys, or other obstacles.
Quiz badge

Module 2 Quiz

Drag & Drop — match each control method to its description, 25 pts each

Drag these →

Radio Remote
Basket Controls
Ground Emergency
Emergency Electro-Pump

→ Drop into the correct description

Ground-level operationStandard method — internal battery powered; can be tethered to machine power if both batteries fail
Drop here
In-basket operationLocated inside the basket; activating it disconnects the ground radio
Drop here
Electronic bypassAllows a ground operator to manually push valves and operate functions individually, bypassing all electronics
Drop here
Emergency rescue onlyRuns off machine battery; intended solely to safely lower a worker stuck in the air
Drop here

Module 2 Score

0

/ 100 pts

Module 3

SYSTEMS &
MAINTENANCE

The machine can supply power, air, and water to the basket — and it requires regular greasing to keep the turret healthy. Small mistakes in either area create big problems.

Video 7 of 11 — Air, Water & Power in the Basket

Basket Power & Air/Water System Details

Power in the Basket: The machine uses a power-in-the-basket system — an extension cord runs through the boom rather than requiring a separate power source. To supply power to the basket, place a generator on the custom platform on the opposite side of the machine and plug it into this cord. The generator travels with the machine.

Air or Water Supply: The boom is plumbed with a high-pressure hydraulic line that can carry air or water:

  • Connect an air compressor for pneumatic tools
  • Connect a pressure washer via the built-in quick-connect
  • Both ends have valves for controlling flow
  • There is a connection for a short airline inside the basket
End-of-Day Rule: If liquid was used in the boom's plumbing, open the valves at BOTH the top and bottom ends to drain the line before shutting down. Failing to drain leaves liquid in the line — the next time the air system is used, that liquid travels through the system and can cause damage.
Video 8 of 11 — Maintenance: Greasing the Turret

Turret Greasing Procedure

Frequency: The turret needs to be greased often — this is a frequent maintenance task, not a seasonal one.

Positioning: To access the turret grease circuit, the boom must be twisted at a 90-degree angle. This exposes the base of the turret.

Accessing the Circuit: The grease fitting is at the base of the turret. Move the wire loom and hoses out of the way to reach it with the grease gun.

Critical Amount: Apply only two or three squirts of grease. Applying too much will blow out the internal seal — this is an expensive repair that is easily avoided.
Quiz badge

Module 3 Quiz

Multiple Choice — 5 questions, 20 pts each

Question 1 of 5

What powers the basket in the power-in-the-basket system?

AThe diesel engine directly
BAn extension cord running through the boom
CA separate battery stored in the basket
DThe outrigger hydraulic system
Question 2 of 5

Where can a generator be placed so that it travels with the machine while powering the basket?

AOn the boom arm
BOn the trailer hitch
COn the custom platform on the opposite side of the machine
DInside the basket alongside the worker
Question 3 of 5

If liquid was used in the boom’s air/water system, what must be done at the end of the day?

AAdd more fluid to maintain pressure in the line
BOpen the valves at both top and bottom to drain the line
CSeal all connections tightly
DFlush with compressed air only
Question 4 of 5

When greasing the turret, how much grease should be applied at each service?

AFill completely until you feel resistance
B10 to 15 squirts for full coverage
COnly two or three squirts
DGrease is only needed once per season
Question 5 of 5

What boom position is needed to access the turret grease circuit?

AWhen the boom is fully extended
BWhen the boom is twisted at a 90-degree angle
COnly when the machine is completely powered off
DAfter lowering the boom to the home position

Module 3 Score

0

/ 100 pts

Module 4

QUICK FIXES &
TROUBLESHOOTING

The machine will test you. These three videos cover the most common field problems — engine won't start, boom won't lift, and outrigger pressure errors. Know these cold before your first job.

Video 9 of 11 — Quick Fix: Machine Won't Start

Machine Won't Start — Three Things to Check

1. Battery Cutoff Switch — If there is absolutely no battery power, the battery cutoff switch is the most likely cause. This switch is used when leaving the machine on a job site overnight. Make sure it is set to the "ready to run" position rather than "shut off."

2. Emergency Shutoff Switches — The machine has multiple kill switches on the main unit and inside the basket. If any are pushed in, the machine will not start. These switches look like they've popped back out, but they usually require a twist to fully reset and release. Check every emergency shutoff switch on the machine.

3. Remote Control Issues — If the controls are in the start position but the remote has no battery power, the machine will not receive the start signal. Check that the remote batteries are charged or that the unit is properly powered.

Video 10 of 11 — Quick Fix: Outrigger Pressure Error

Outrigger Pressure Error — How to Reset

If the machine suddenly stops functioning and feels like it's "quitting" on you, check for an outrigger pressure warning. An LED light on one of the outriggers indicates the machine no longer detects pressure on that specific leg — it may think you've broken through frost or soft mud.

How to Fix It:

  1. Use the Allen kit (included with the remote) to remove the Allen bolts on the affected outrigger housing.
  2. Under the cover, locate the spring-loaded switch.
  3. Manually work the spring-loaded switch a few times.
  4. Replace the cover. The warning lights should clear and full machine functionality should return.
Video 11 of 11 — Quick Fix: Boom Won't Lift

Boom Won't Lift — Two Common Causes

1. Locking Pins Not Fully Seated — The boom will not move if the outrigger locking pins are not fully locked into place. Although the status may show on the display, the indicator lights can be misleading. Physically check that all pins are completely down — every single time you set up.

2. Basket Out of Level — After performing multiple functions, the basket can work its way out of level. Check the display for the specific LED light that indicates this condition. Leveling the basket should restore full boom operation.

Quiz badge

Module 4 Quiz

Multiple Choice — 4 questions, 25 pts each

Question 1 of 4

If the machine shows absolutely no battery power and will not start, what is the most likely cause?

AThe diesel engine has failed
BThe battery cutoff switch is in the "shut off" position
CThe remote control has failed completely
DA blown outrigger fuse
Question 2 of 4

Emergency kill switches on the machine require what specific action to fully reset them after being pushed in?

AHold the switch for 3 seconds
BPress the switch twice rapidly
CA twist to physically release the latch
DReplace the switch entirely
Question 3 of 4

After performing multiple operations, the boom stops functioning. What display indicator should you check?

AThe fuel level gauge
BThe track width setting
CThe basket leveling LED indicator
DThe radio remote battery indicator
Question 4 of 4

To clear an outrigger pressure sensor error, you remove Allen bolts to access and manually work what component?

AA hydraulic valve
BA pressure gauge
CA spring-loaded switch
DThe LED indicator housing

Module 4 Score

0

/ 100 pts

Module 5

JEOPARDY
EXAM PREP

Test your knowledge across all four modules before the final exam. Earn bonus points — jeopardy scores are added on top of your regular total.

Module 6

FINAL TIMED
EXAM

15 questions, 45 seconds each. All four modules covered. 20 points per correct answer — 300 points total. This triggers your certificate of completion.

15

Questions

Covering all four training modules.

45s

Per Question

The clock resets on each new question.

20

Points Each

300 points total available on the final exam.

Course Complete

YOUR CERTIFICATE

0

Total Points Earned

Enter your name to generate your certificate of completion.

Certificate of Completion
Your Name
Your Progress

SESSION HISTORY

Loading history...

LIFT JEOPARDY

Bonus: $0
Machine Basics
Power & Starting
Controls & Remote
Maintenance
Troubleshooting
$100
$100
$100
$100
$100
$200
$200
$200
$200
$200
$300
$300
$300
$300
$300
$400
$400
$400
$400
$400